How to get a free domain name?
Are you ready to launch a new website?
Finding and registering a domain name is the first step in this process.
The first question that arises is whether to choose a free domain name or purchase one?
For those of you who have never taken this step before, I understand that it can be a little intimidating. You may not know where to start. At the same time, you may hesitate to spend money: for the purchase of a domain name, among other things.
The good news is that you are not required to pay to register a domain name. There are actually several ways to get a domain name for free. In fact, this is valid for all projects: creating a blog, an online portfolio, a personal website, a professional website...
In this guide, I will show you my tips for getting a free domain name.
1. Use Bluehost
Free domain name included in your hosting plan
Bluehost
Now, I will guide you step by step through the process of obtaining a free domain name with
Step 1: Go to Bluehost.com
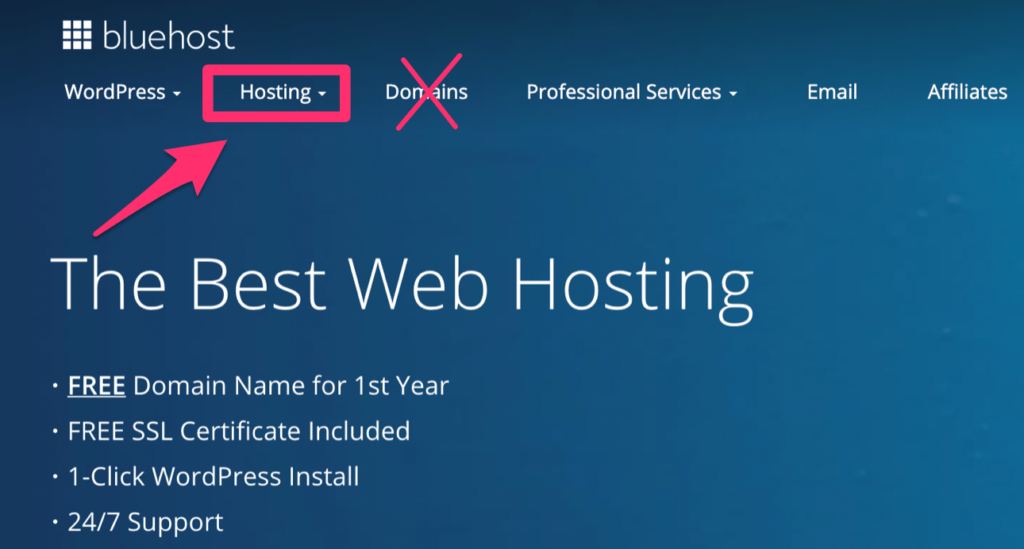
Once you are on their website, look at the menu and choose the category: domain. But:
It's a common mistake. I understand very well that it seems like a logical place to find their free domain name service. However, by choosing this method, you will not get a free domain name.
I advise you to go to the "Accommodation" category instead. I illustrate it very well in the following photo:
Bluehost offers three different types of web hosting: shared hosting, VPS hosting, and dedicated hosting. All of these types of hosting come with a free domain name for one year.
If you are launching a new website from scratch and are interested in a free domain name, shared hosting will be the best option for you. Other types of hosting are more expensive and offer resources that you probably won't need right now.
Step 2: Choose a web hosting plan
Bluehost offers four different shared hosting plans. Here is an overview of the different prices for each of them:
For each plan, here are the features:
Basic
Hosting a website with 50 GB of storage
Largeur de bande non mesurée
Certificat SSL gratuit
Cinq noms de domaines et 25 sous-domaines
Plus
Host unlimited websites with unlimited storage capacity
Noms domaines, domaines et sous-domaines illimités
Experts en matière de spam
Boîte aux lettres Office 365 gratuite pendant 30 jours
Choice Plus
Unlimited websites and unlimited storage
Nom de domaine vie privée et protection
Sauvegarde du site – CodeGuard Basic
Professional
Unlimited websites and storage
2 experts en matière de spam
Haute performance
IP dédié
If you are new to the web industry, basic hosting is the best option. Later on, as your site grows, you will always have the option to upgrade to a higher offer.
Here again, you will get a free domain name for one year, regardless of the plan chosen.
Step 3: Choose a free domain name
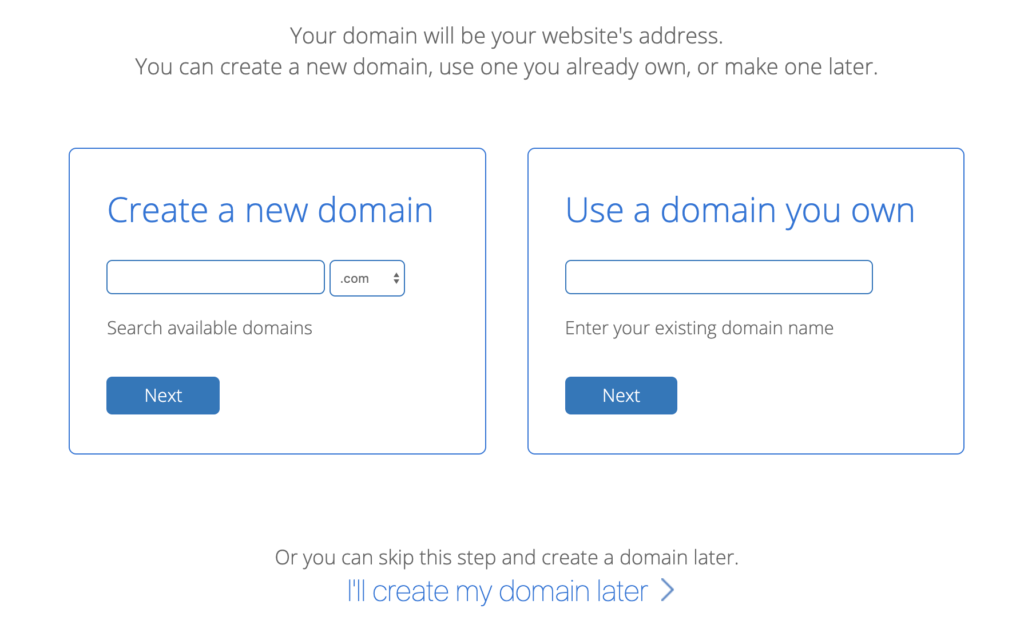
After choosing a hosting plan, you will be redirected to this page:
You will have 3 options:
Create a new domain name
Utiliser un nom domaine existant (que vous possédez déjà)
Créer un nom domaine plus tard
Suppose you already know which domain name you want. In this case, enter it in the bar on the left side of the screen. Bluehost offers domain names with different extensions, including:
.com
.ch
.fr
.io
.online
.site
.webspace
.space
.tech
.store
.blog
.net
.org
.info
.co
.biz
.us
.club
Unless you have a specific reason, it is best to choose the .com domain (especially if you plan to continue your online business for a long time). In general, people choose other extensions because of the price, the country they are targeting, or the availability of the domain name.
The extensions like .site or .tech are cheaper.
In case the domain name with a .com extension is not available, I suggest choosing another available domain name. For more information
Step 4: Create your account
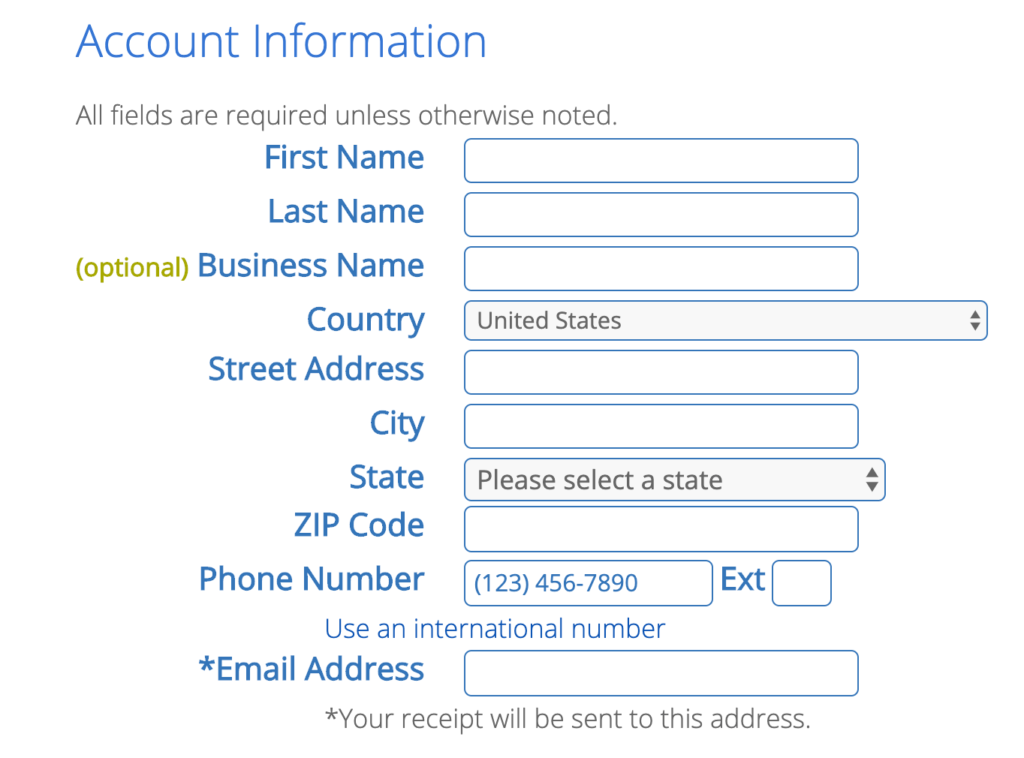
If you do not already have a BlueHost account, you will be invited to create one. Otherwise, you will not be able to get a free domain name.
So, creating an account is very simple. Just fill in the fields of the form with the required information.
All of this is pretty standard. You will be asked to fill out the same information on the registration (and payment) page of almost every website.
Step 5: Choose your billing terms
On this same registration page, you will be asked to choose the terms of your plan. The price varies depending on the duration of the contract, with contracts available for 12, 24, and 36 months.
Here are the prices for Bluehost's entry-level shared hosting plan:
12 months plan - $5.95 per month ($71.40 total)
Base 24 mois – 4,95.- par mois (118,80.- au total)
Base 36 mois – 3,95.- par mois (142,20.- au total)
These rates are only valid for your first contract. Bluehost Basic renews at $7.99 per month.
The 36-month contract gives you the best price, but it requires you to pay the highest amount at the time of registration. It all depends on your preference. Some people, for example, prefer to pay more to avoid a long-term contract, while others do not like this alternative.
Step #6: Select additional features (optional)
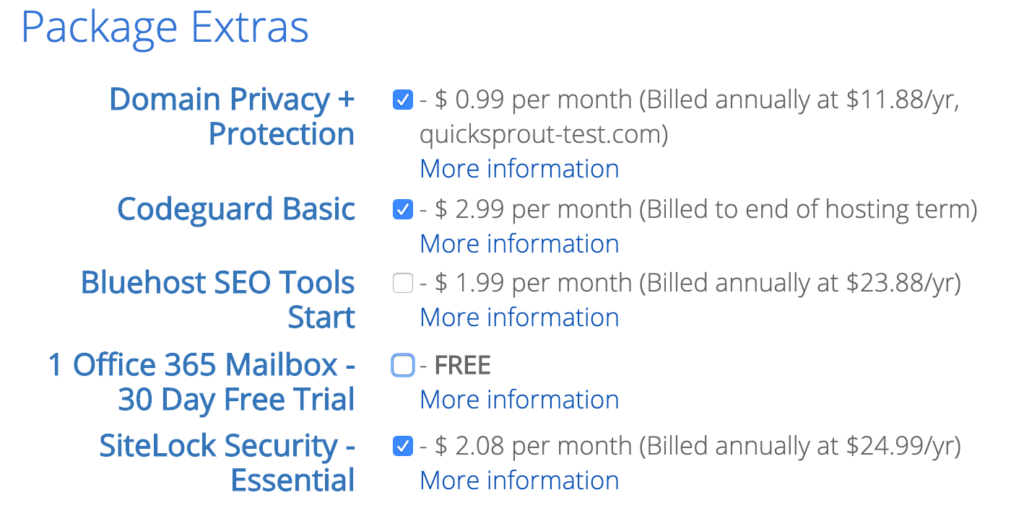
Before entering your payment details and finalizing the contract, Bluehost offers you a series of additional options that you may consider.
At a minimum, I recommend the option for protection and privacy of your domain name for free. Without this, your personal information will be listed in a public database. If you use WordPress, I invite you to read my guide on the subject: the
Here are the information to protect: name, phone number, postal address, and email address.
Spammers will be happy to harvest them if they are not hidden.
Regarding CodeGuard Basic, it handles daily backups, automatic monitoring, and one-click version restores. While these features are available through other methods, such as WordPress plugins. For more information, I recommend reading my other article on
SiteLock Security Essential est un autre complément populaire. Il couvre une protection supplémentaire contre les logiciels malveillants, la surveillance des listes noires, la suppression automatique des logiciels malveillants, l’analyse au niveau des fichiers, etc.
Once again, you can always obtain this additional security later on by using a plug-in or another service.
The final step is to enter your payment information. Bluehost allows you to pay with credit card (Visa, Mastercard, Discover, and American Express) or PayPal.
Once you have accepted the terms of service, your hosting account will be set up and you will have a free domain name for one year.
Bluehost offers a 30-day money-back guarantee. So you can get a full refund of your hosting fees if you change your mind during this period.
Other ways to get a free domain name
If Bluehost is the best way to get a free domain name, it's not the only one. I will show you some alternative methods to get a free domain name.
1. Use a free subdomain
Many website creators and other services offer free subdomains.
For example, if you use a free website builder like Wix to create your site, you won't have to pay anything for a domain name. However, your site will have a subdomain in this format:
yourusername.wixsite.com/yoursiteaddress
Here's what it would look like if your Wix username was "My Stunning Website 123" and the domain name you wanted was "myblogsite".
This is obviously not ideal. No credible website has a domain name like this. The only case where I would consider using this method is when experimenting with free features of the website builder. In any case, this is not a viable long-term strategy.
WordPress is another popular option for a free subdomain. But it is not as powerful as Wix.
The format for a free WordPress subdomain is as follows:
votrenom.wordpress.com
You can get by for a while if you use WordPress to manage a small blog or personal website. However, you will eventually give up if you want to build an online reputation.
2. Advertising programs for domain name registration websites
There are many domain registration sites that will give you a free domain name in exchange for displaying ads on your website. It's a good idea, but I don't think it's the best way to go about it.
You will have no control over the ads and where they will be placed on your page. Not only will the visitor experience be hindered, but it will also harm your ranking in search engines.
What if your website was visited a million times? You won't even get a penny from those ads. Your share is only limited to your free domain name.
If you want my opinion, use Google for advertising on your website; it is legitimate. Do not exchange ads for a free domain name.
ccTLD services for a free domain name (not recommended)
The web is full of free TLD (top-level domain) services for different country codes (cc). This is the extension that follows your free domain name.
You can therefore register your free domain name with country codes such as:
.tk – Tokelau
.ml – Mali
.ga – Gabon
.cf – République centrafricaine
.gq – Guinée équatoriale
You can get them from services like Freenom or Dok.tk. But I strongly advise against it.
Saying that it is a simplistic way to get a free domain name is an understatement. If you look at the reviews on the web about these services, you will only find criticisms.
You will be a victim of malicious ads on your website. I strongly advise against using this type of free domain name.
Conclusion
Bluehost is the best way to get a free domain name. Just subscribe to a web hosting plan, and they will give you a free domain name for one year.
There are other ways to avoid paying for a domain name, such as using a free subdomain or joining an affiliate program. But personally, I would not recommend the majority of these two options to get a free domain name.
If you are thinking of obtaining a free domain name using a random country code from a South Pacific island, it is also not a good idea. Saving a few pennies is absolutely not worth it.
Stay with Bluehost, or check out the


